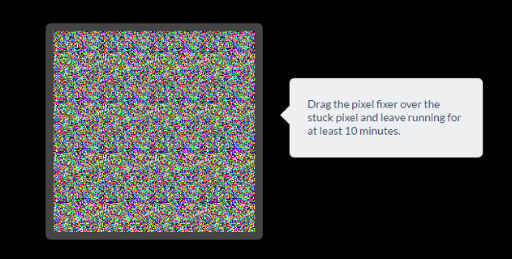
Your screen is made up of millions of pixel with each consisting of three subpixels (Red, Green, and Blue). When the subpixels become electronically charged they change colour rapidly thus forming the moving image you see. However, sometimes the pixels can malfunction resulting in either a dead or stuck pixel. What’s the difference? A dead pixel is when none of the 3 subpixels is working and in most cases, this is usually unfixable. The stuck pixel, on the other hand, occurs one or two of the subpixels remain on while the rest are off. The good news is that you can easily fix this with the right tools. Here are the five best software that can possibly fix a stuck pixel as well as a dead pixel (the ones that are not actually dead). This is a very useful Java utility tool that will definitely help you to fix the stuck and the dead pixels yourself and the good thing is that it is free and very easy to use. It is a free tool and, therefore does not involve any installation. Once you have opened the web app’s page then all you have to do is drag the PixelFixer window to the stuck pixel area and leave it for at least 10 minutes. After that that you will be able to see the restored stuck pixel on your screen. If it does not respond, you can try it a couple of times until it is successful. If it’s still not working, then don’t stress. We still have 4 more software for you to use. PixelHealer is the other great tool that I recommend for fixing your dead pixel. It is a free, user-friendly app that can be used by anyone. It does not require any previous knowledge in the working concept of a pixel fixer. It is compatible with all versions of Windows starting from Windows 7 upwards. Once you have downloaded the software, What you are required to do is cover the dead pixel with the colour window and click on Start Flashing button. PixeHealer allows you to easily resize the colour window with your mouse and also adjust the interval at which the window flashes so that the remedy process is more effective. Note that it may take a little while to fix your injured pixels. Usually 30 minutes. You should be warned though. These flashing lights have been known to trigger epilepsy attacks. Don’t stare too much. This tool won’t bring back the completely dead pixels back to life, neither will the other tools, but it will work great if they are just stuck on a particular colour. This software includes a Dead Pixel Locator feature that you can use to check for faulty pixels on your screen and determine whether they are stuck or dead. This feature can also help you find dirt spots on your screen by changing the background to a bright solid colour. Once you have located the pixel, it’s time to fix it. Rizone Pixel Repair features several colour modes you can choose from and also allows you to alter the speed of the flashing window. If fixing the stuck pixels does not work the first time, try a different colour sequence and adjust the flashing speed. Note that there is no guarantee that the process will work. Actually, Rizone categorically states in their software that it will not work every time. This is another great tool that you can use to detect stuck pixels on your screen and fix them. It has a very easy to use One-Window interface that is divided into two parts. The dead pixel locator is featured on the left and comes with a variety of test colours to choose from. The selected colour then fills up your screen allowing you to identify the stubborn square spots on your screen. Make sure your screen is well cleaned to avoid misdiagnosis. May turn out the supposed dead pixel is a dirt spot. Once you have located the stuck pixel switch to the undead pixel section. Here you can open multiple flash windows depending on the number of faulty pixels you have. UndeadPixel also allows you to adjust the flashing intervals for better results. Once all settings are okay the press start and the remedy process will begin. This is a handy Windows tool that will enable you to easily repair the stuck or dead pixels on your LCD screen. The interface may be a little technical requiring a more experienced user but not in a big way. All the options are well organized and labelled so with a little intuition even the basic user can master it quickly. Pixel Doctor provides you with a number of colours you can choose from to help you better identify the faulty pixels on your screen. You will then have to choose between two types of test, single and cycle test. Then finally you can either run the test in full mode or on a specified area on your screen. We recommend the full-screen test as it is more effective. The mechanism used by Pixel Doctor to unstick your pixels is called Therapies and it works by flashing colours rapidly on the stuck pixels.
Best Free DVD Burning Softwares for Windows 10The 5 Best Antivirus Softwares for Windows XPThe 5 Best Antivirus Softwares for Windows 7The 5 Best Softwares for Making Beats
![]()
![]()
![]()
![]()
![]()
![]()
![]()
![]()
![]()
